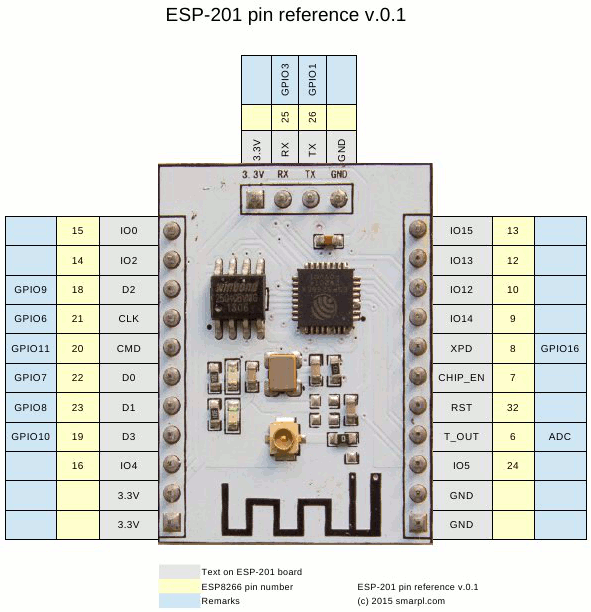
- IO15 – GND
- CHIP_EN – เป็นขาที่ต้องต่อไฟ VCC
- Reset – VCC
- IO0 – GND
|
1 2 3 4 5 6 7 8 9 10 11 12 13 14 15 16 17 18 19 20 21 22 23 24 25 26 27 28 29 30 31 32 |
#include <ESP8266WiFi.h> const char* ssid = "Tenda_3EF910"; // ชื่อ WiFi Access Point ที่ต้องการเชื่อมต่อ const char* password = "gift4321"; //รหัสผ่าน Access Point void setup() { pinMode(5, OUTPUT); Serial.begin(115200); //ตั้งค่าใช้งาน serial ที่ baudrate 115200 delay(10); Serial.print("Connecting to "); //แสดงข้อความ “Connecting to” Serial.println(ssid); //แสดงข้อความ ชื่อ SSID WiFi.begin(ssid, password); // สั่งให้เชื่อมต่อกับ AP //WiFi.begin(ssid); // กรณีเชื่อมต่อแบบไม่มี password while (WiFi.status() != WL_CONNECTED) //รอจนกว่าจะเชื่อมต่อสำเร็จ { delay(500); Serial.print("*"); } Serial.println(""); Serial.println("WiFi connected"); //แสดงข้อความเชื่อมต่อสำเร็จ Serial.println("IP address: "); Serial.println(WiFi.localIP()); //แสดงหมายเลข IP NodeMCU ของเรา } void loop() { digitalWrite(5, LOW); // Turn the LED on (Note that LOW is the voltage level // but actually the LED is on; this is because // it is acive low on the ESP-01) delay(1000); // Wait for a second digitalWrite(5, HIGH); // Turn the LED off by making the voltage HIGH delay(1000); } |
ยังไม่มีคอมเมนต์
คุณสามารถเป็นคนแรกที่คอมเมนต์